This is the Autochart Live Chart Live chapter from the new Doctor Sonar Helix training DVD to released in a few months. Once you use Autochart Live you will be hooked!
Watch Video

Finding fish with side imaging is difficult for most anglers since we don’t have enough screens on the boat. We tend to select map, sonar and Down Imaging and forget about the side imaging, but finding fish is easy if you have the right conditions. One of the problems we run into is that a rocky bottom reflects so much of the sonar it’s bright and fish show up as bright areas which means there is little contrast and they are easily hidden, while softer bottoms show up darker so fish really show up in this image.
Notice all the fish on the right on the first image.

I usually leave my unit on 455 kHz since you get much more range than with 800 kHz.
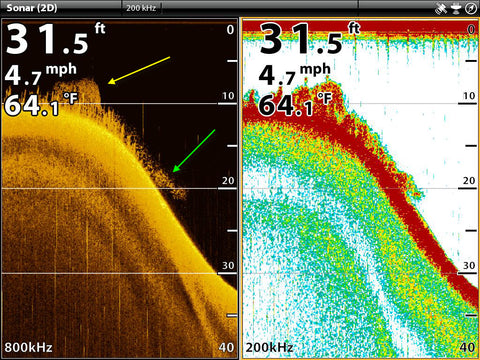
The next image shows larger fish in the red circle and smaller fish in the green circles. Notice the depth is 3.7 ft.

But don’t be fooled by logs on the bottom left over from the timber logging industry.
Yellow arrows are pointing out the logs.
The red circles are around fish which show up as white dots.

The next image has more fish that are longer. Here we need to remember the length of the fish is dependent on boat speed. The faster the boat travels the fewer sonar pings that are going to cover the fish so their length will show up shorter.
Another good way for identifying fish is the shadow the fish cast, the farther away the shadow is from the fish the higher in the water column the fish is located.
The red and black circles show fish and shadows. The fish nearer the center are harder to see since the bottom is brighter nearer the center so the shadow becomes helpful in identifying the fish.
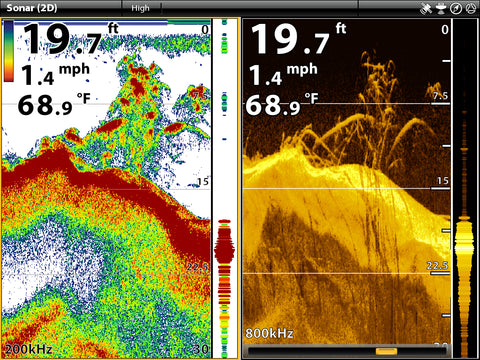
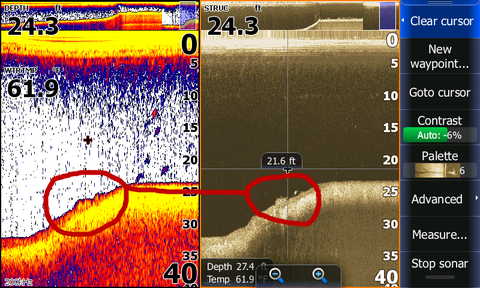
Interpreting sonar, down imaging and side imaging is very difficult. I have 3 great images to use as examples for teaching interpretation of sonar.
The left side imaging is showing the drop-off as dark (yellow arrows point to the drop-off on the map and side image). Bright is the strongest return and black is none. Since sound goes in a straight line the drop-off is dark.
The red circle is showing fish on the shallow side and I think they are about where the red arrow is pointing on the map. I would mark a waypoint on the side image and cast to the fish since they are shallow. Notice the boat is in 2.9 feet.

The next image shows the drop-off as dark (red circle) and fish are suspended near the drop (yellow arrow). Fish show up well on side imaging since they show up as bright on the dark background. Hard bottom is also bright which makes fish difficult to see on bright background.

This is an amazingly clear image of boulders (green arrow) next to trees (yellow arrow) that slid from the bank into the river.
The red arrow shows a fish in the trees and the white arrow shows a small drop-off.

Minn Kota Ultrex Review
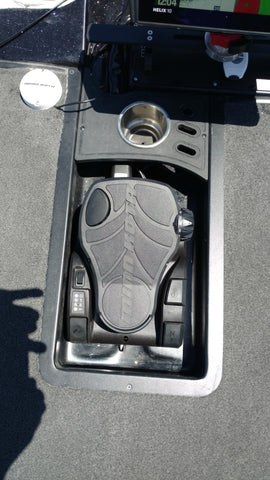
I am at ICAST 2016 at Orlando, Florida and I finally got my foot on the new Minn Kota Ultrex and I am really impressed.
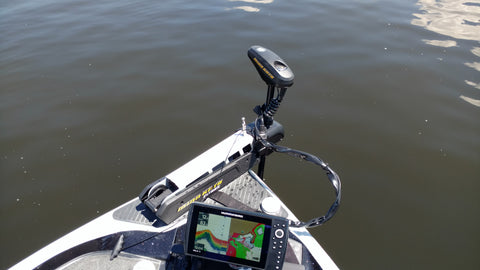
This motor is cable steer plus electric steer so you get the advantages of both.
The cable steer models give you feedback from the pedal on where the trolling motor is pointed so I can control it without watching which way the head is pointing. With electric steer motors I watch the head to see which way it is pointed.
The cable drive foot pedal is much easier to control while fishing and is hands free. The electric steer pedals suck compared to cable steer so I use the hand held control.
Another disadvantage of the cable steer is when under power and you take your foot off the pedal to catch a fish it doesn’t stay straight but the electric steer does.
The Ultrex gives you the advantages of both which is an amazing accomplishment by Minn Kota.
I use both the Minn Kota Ulterra and the MotorGuide Xi5 for 2 seasons and love both. I used to spend all my time in the bow on a Minn Kota Fortrex until I found the value of Spot Lock.
The MotorGuide Anchor Lock works much better than the Minn Kota Spot Lock and that advantage is now gone.
My test showed the new Spot Lock was the best I have used. The boat didn’t move off the spot and the jog feature worked as advertised. The jog feature allows you to move the boat left/right/ahead/back in increments of 5 ft. My MotorGuide has the feature and is very valuable so getting this on the Minn Kota makes my day. The old Minn Kota Spot Lock didn’t have this and you had to disengage the Spot Lock, move the boat to where you wanted and engage Spot Lock but I never got the boat exactly where I wanted and now it works the way I want.
I ran the cable steer and it was smooth and responsive like my Fortrex. Looks like I will be back on the bow when I need the precision control of cable steer.
The stow and deploy is the old pull a cord method but works well and I had no problem pulling it and I am 67 YO.
It looks like I will give up my Ulterra for the Ultrex when it becomes available in spite of how much I like a motor the stows and deploys with the push of a button from my console seat!
I get many questions on what to use to view and edit waypoints on a computer. One program that will import many different brand waypoints is Contour Elite.
The background map is LakeMaster so you view your waypoints on structure.
I believe a background map is needed when you edit waypoints by name since the map helps you decide on what to name them.

You can import Google Earth, Lowrance, Garmin, Humminbird and Raymarine plus others.

Contour Elite is what SmartStrike is on a Humminbird. You can select criteria on fish based on light conditions, wind time of year and other criteria to find starting spots to fish on a new lake. There are many other features, learn more. Use this code to get 10% off DOC10.
I finally got to play around with the new Lowrance 3D StructureScan and used it to target suspended crappie.
The 3D display works like side can but now you can see where the fish are suspended in the water column. With side scan you can only see the fish are off to the side not where they are in the water column.
This image shows the prop wash bubbles (red circle) and the crappies suspended on the left side (green arrow).

The next image shows the crappies as history as I drive back to them. The red arrows show the prop wash bubbles and the green arrows different schools of crappie. You can rotate the screen to give these different views of the 3D live. So far I have only found it useful for suspended fish but there will be more crappie tacos for me because of this tool.

Don’t miss supper, get better at sonar and fish where there are fish. Use the splitscreen sonar and down imaging and compare the two and you will become an expert.
Down imaging has a narrow wide cone and the 2D sonar has a round cone so they view targets differently and comparing the two makes interpreting sonar much easier.
This image is showing trees and the 2D sonar on the left is difficult to interpret but the down imaging shows the trees well.
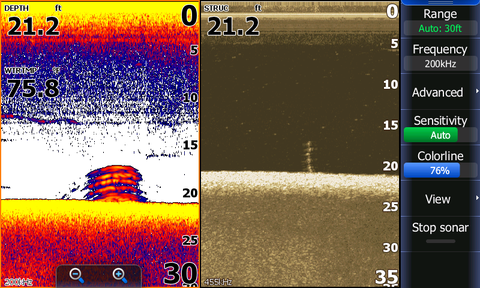
This image shows fish on the side of a boulder but the down imaging shows 2 fish and I get much more excited seeing two fish than one.
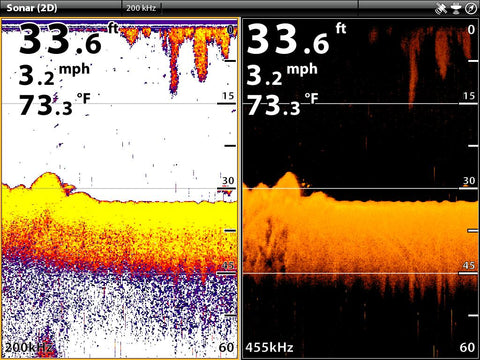
This image shows 2 bait balls in weeds (yellow and green arrows) that the 2D sonar looks like weeds.
This image looks like stacked fish because of the arches but it is a common when you have posts or trees.
On this image the bait ball and the larger fish near it are missed with 2d sonar.
I see images like these everyday on the water since I usually run down imaging with 2d sonar. If you miss a fish on sonar you may miss supper.
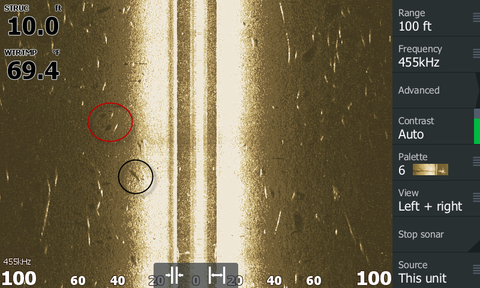
I was out casting for shallow walleyes today and my ONIX side imaging was amazing.
I was in 2.8 feet of water and took this screenshot. Notice the range of 119 on each side and the screen is loaded with fish.
The fish are in the green circles and some rock in the black circle.
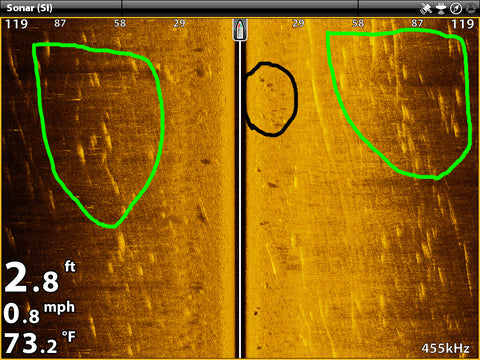
I was able to identify some of the fish since we caught sheephead and catfish plus I saw a school of carp swim by and a 5 foot sturgeon also swam by. No walleyes but we had an amazing experience.

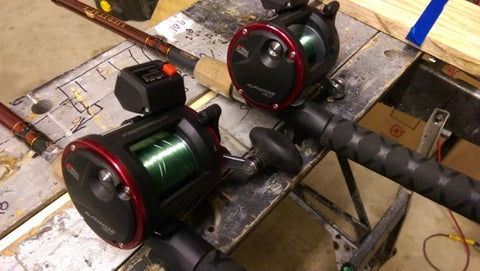
Line Counter Reels are you shorting yourself?
By Kirt Hedquist Doctor Sonar Pro Staff
Lots of anglers like to troll, whether it be the great lakes, rivers and small lakes. Trolling is an effective way to catch fish, you cover lots of water and you can cover the water column effectively searching for active fish, the fish are always biting somewhere. I have won 2 championships trolling over the years.
There is some science behind trolling, you need to know the depth your lures are running and there are a number of determining factors on how deep your lure or bait is running. Type of lure, size of lure, line size, with or against the water current and the amount of line between the rod tip and the lure. Pretty much every lure or bait as dive curve based on specific data gathered, a great tool for dive curves is the Precision Trolling app, it’s a pretty slick deal the folks Precision trolling have taken the time to map this data out for easy reference.
There is one thing that maybe often overlooked the amount of line on the line counter reel. Have you ever spooled up your trolling reel and said well ½ full is enough line and why waste the line? There is a method of verifying that the amount of line let out matches the number on your line counter reel, its called calibrating your line counter reel, many seasoned trollers know about this. When you let out a 100’ of line is it really a 100’ or is it 60’?
Try this next time, measure out a 100’ in your yard or wherever, set your line counter rod reel up counter zeroed out and pull out the line and see where your line counter ends up, you may be amazed at where it ends up!
I spent some time playing with the amount of line on the reel vs the distance shown on my line counter reel. I use the Abu Garcia Alphamar size 16 Line Counter reels they are capable of holding 370 yds of 15# mono line, capacity varies with line weights. They are designed to use all sizes of line and most line counters should have this data on them or available online. Line counters are designed to be the most accurate with a full spool of line.
I started out by spooling 800’ according to the line counter which put it at about 1/3 full on the spool, set the counter to zero and walked out to 100’ mark and looked at my counter and it said 165’! Doing some guestimation here and letting out what is presumed to be 100’ of line is only approx. 60’ of line approx.
So here is the scenario on the water with this much line on my reel because thinking that a reel 1/3 full was enough. Driving around marking suspended fish at 14’ down, open the handy dive app and it says a #7 Flicker Shad will dive to 13’ with 100’ of line out. Setup on trolling run letting out supposedly 100’ of line to get the Flicker Shad down to the required fish catching depth in reality it’s only approx. 65’ at a depth of 10’ falling short of where the fish are in the water column totally missing the fish and letting the skunk into the boat.

While experimenting with how full the spool was vs the distance out, I added enough line to fill it half way approx. 1000’ of line, at this point I zeroed out my line counter and pulled out enough line to reach my 100’ marker and the line counter now showed 139’ of line out I added another 200’ of line and tried it again and this time I was at 128’ on my line counter. As you can see the fuller the spool the more accurate the counter became. I did some more guestimation math in my head and added enough line to bring the spool up to full capacity which equated to 2000’ on the line counter. Again I pulled out enough line to reach my 100’ marker in the yard and I was at 105’, I added another 50’ of line and was at 97’ this time, I removed about 20’ of line this time and I hit 100’ right on the money. I double checked this a couple of times and it repeated itself.
With this in mind I repeated the same process of spooling up 2000’ on the reel line counter to my other 3 Alphamar 16 reels and each time I was within 4’ + or – of 100’, using the info I had found above I fine-tuned all my reels so each reads 100’ at my yard marker.

I also have some Abu Garcia 5500 LC’s with 300yds of 14# Fireline that I use for trolling and bottom bouncing and I repeated the same procedure as above. Because I didn’t want to fill my entire spool with Fireline and used Berkley Trilene Big Game 10# test backer initially, I measured on 300 yds of the Big game monofilament backer material then added my Fireline main line. I tested this with my 100’ marker and it came out to 99’, got lucky on this calculation.
Some tips on calibrating linecounters-
- Use an inexpensive line like Berkley Trilene Big Game 10# test as backer or filler leave enough space or about 400’ for the mainline.
- Use the same amount and make of backer on all your reels if they are the same.
- Write these lengths down.
- When replacing the line only replace the main line leave the backer in place.
- Line counter reads more than the actual measurement add line to the reel.
- Line counter reads less than the actual measurement remove line from the reel.
- Use a bulk spool of line such as Berkley 10# Trilene XT Bulk Spool, don’t cut it off until the reel is calibrated correctly. This allows you to remove or add line.
- As you are reaching full capacity on the spool start checking the calibration as described above.
Bottom line don’t short yourself on your trolling rod set ups spend some time calibrating your reels and keep the skunk out of your boat.
From Johnnie Candle pro walleye angler and full time guide on Devils Lake.
I use this method to target individual fish using the I Pilot link to a Humminbird Core model, Helix or ONIX. I Pilot Link makes fishing for individual fish incredibly easy. When graphing a location, I will have my trolling motor in the water. With the new Ulterra, I don’t even have to get out of my seat to do this. I will have my Helix or ONIX in split screen mode with the active side being the sonar side or just the sonar screen. If I mark a fish that I want to target, I will place the cursor over that fish and create a waypoint.

Stop the boat, then using the menu or the touch screen to spot lock on that waypoint from your Humminbird. As the boat drives itself to that waypoint, I have time to grab my fishing rod and be ready to fish when the boat arrives to that fish. It is amazing how many times you will catch that fish.